
Hello everyone! This is my first how to/DIY post in a while- if at all- and I’m really excited to show you how to make some super cute printed whales! Back in eighth grade, my computer class was taught how to use a website called Pixlr, where you can edit and tweak photos and do some super cool things to them! I learned so many tricks to that website, and use it all the time! The other day, I was trying to figure out a design for our class t-shirts for my school. I had an idea in mind but wanted to see how it would look on the computer instead of a rough sketch. I played around on Pixlr until I finally created what I had in mind for the t-shirts, and then I started thinking. It would be super cute to take the Vineyard Vines whale logo and add fun prints to it! I’ve seen the printed whales everywhere but never knew how to create them. Read on for instructions on how to create your own printed whales!

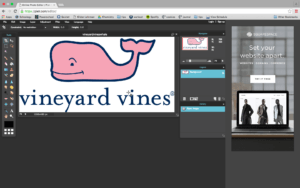
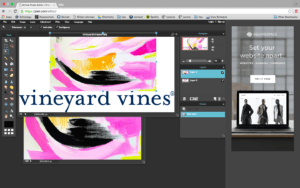
Step One // Download this image. Go to Pixlr and click “open image from computer”. Open up the image you just downloaded.
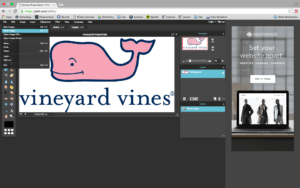
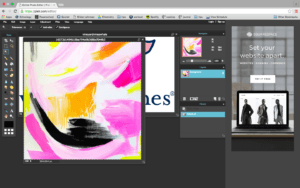
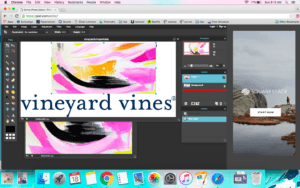
Step Two // Pick a print, pattern, or design that you want to go in your whale and download it to your desktop. Then go back to Pixlr, hover over the “file” tab in the top left, and click open image. Open your pattern that you just picked out.
Step Three // You will now have two images open on your Pixlr workspace. Click your pattern image if you aren’t there already. Type Control+A to select the pattern. Then press Control+C to copy it.
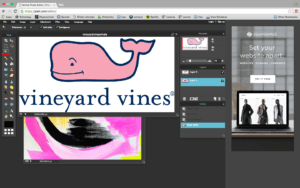
Step Four // Now click back over to your original whale photo. Type Control+V to paste the pattern you just copied. Then, go back to your pattern photo you just selected and press Control+D to deselect the photo.
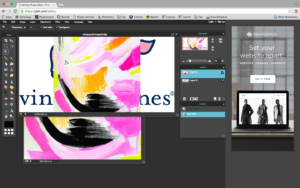
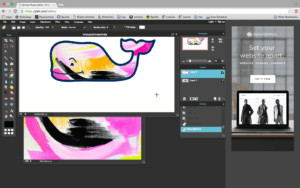
Step Five // If your pattern is too small for the whale, like mine, then you can type Control+T to edit the size and position it exactly over your whale.
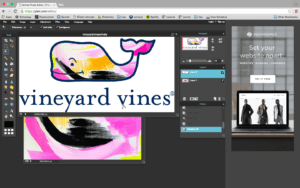
Step Six // It can get a little tricky at this point, so be sure to follow these directions step by step! Look at the “Layers” box in the right side of your workspace. Push the lock and unlock your layers.
Step Seven // Now , still in the “layers” tab, you are going to click and hold on the patterned layer and drag it under your now unlocked whale layer. It should disappear.

Step Eight // Now, look in your “tools” bar on the left. Find the tool that looks like a magic wand and click it.
Step Nine // Now, make sure you are in your whale layer (just click the layer in the “layers” tab, make sure you aren’t on your patterned layer), and using your magic wand tool, click anywhere inside the pink whale. Dotted lines should come surround the outside of the whale. Click the delete key on your computer. Now type Control+D to deselect everything.
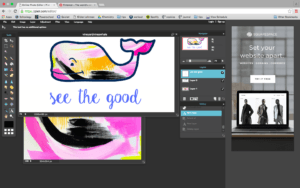
Step Ten // Now that you’re done with your patterned whale, you have a few options about what to do with the text. You can crop it out and just have the whale, or you can add your own text. To do so, just click the drawing tool from your toolbar and draw a white box around the text. If you look up at the top bar of your workspace, make sure that the fill color is white and there is no border.
Step Eleven // Now, click the text tab second to the bottom of the toolbar and click below your whale to start typing. You can adjust your font, color, and size as well!
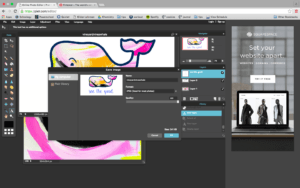
Step Twelve // Now you’re ready to import your design! Type Control+S to save it and make sure you download it as a jpeg with 100% quality. It should appear on your desktop.
Step Thirteen // If you didn’t want any words on it, now is the chance for you to crop the words off. Just drag it into your photos on your computer and crop it from there.
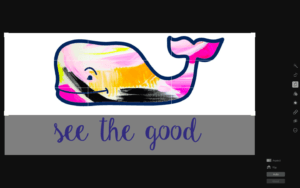
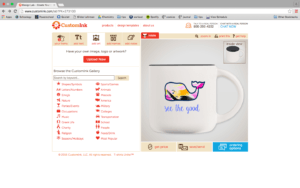
And you’re finished! You can print out your whale, make a fun background on your laptop with it, or think of fun ways to incorporate it into just about anything! You could print out a bunch of different patterned whales and make a collage or whale garland with them to string around your room! Custom Ink is a website where you can convert your designs into a mug, bag, or a t-shirt!
I hope you enjoyed this DIY! Let me know if you have any questions and leave me suggestions for more DIYs in the future! Happy crafting!
xoxo, Addie